Calculating the Cost of a purchased Item
does not only contain the Direct Unit Cost (Purchase Price).
It is often necessary to add Indirect Costs
as well.
With TRIMIT Item Charge, you can
split these Indirect Cost into different Item Charges like Freight, Duty, etc.
With TRIMIT Item Charge, you have a
flexible functionality for handling all these different Item Charges that may
vary depending on for instance the Country where the Item is bought or the
specific Vendor delivering the Item from time to time.
Item Charges
are used in connection with
1)
Calculating the Unit Cost of an Item.
2)
Calculating the Unit Cost of a Purchase Line.
The usage of TRIMIT Item Charges as
Indirect Costs split, is only applicable for Purchase Masters/Items and
therefore only for Purchase Lines, and not for TRIMIT Production Orders.
Therefore, if talking about TRIMIT Item
Charges and outsourced Production you can use the TRIMIT Item Charges on
the Item that is used in the Bill of Materials for the purchase of the
Production Labor (CMT).
You can also use the TRIMIT Item Charges
to add reservations for Sales related Costs (like Freight or Handling
costs), for which you want to post a reservation (for costs to come). These
costs will however not have any influence on the Unit Cost of your Items and
can only be filled in the appropriate fields in the Sales Lines manually.
The functionality
described is the functionality in TRIMIT 21.1 for Business Central W1 BC18.
The pictures in
this White Paper are based on the demo database for TRIMIT 21.1, which
is based on Microsoft Dynamics 365 Business Central 2021 Release Wave 1, in the
demo company CRONUS TRIMIT W1 Ltd. (based on CRONUS International Ltd.
of Microsoft Dynamics 365 Business Central).
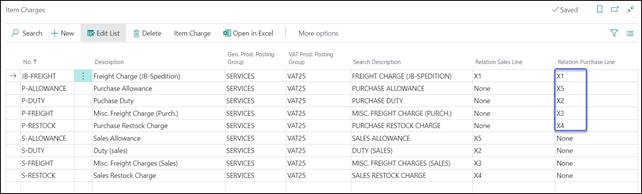
TRIMIT Item Charge contains the following objects:
The tables 6036571 trm Item
Charge Ext extends 5800 Item Charges
6037025
trm Item Charge Calc Line
The pages 6036505 trm
Countries/Regions Ext extends 10 Countries/Regions
6036515
trm Vendor Card Ext extends 26 Vendor Card
6036516 trm Vendor List Ext extends 27 Vendor
List
6036579 trm Territories Ext extends 429
Territories
6036602
trm Item Charges Ext extends 5800 Item
Charges
6037022 trm
Item Charge Calc Lines
Item Charges can be related to Items,
Masters, Vendors, Territories or Country/Regions, or it can be created as a
general Item Charge.
Therefore, you can setup the Item Charge
percentages and amounts via all these pages.
First, you need to create Item Charge codes
via Tell me Item Charges.
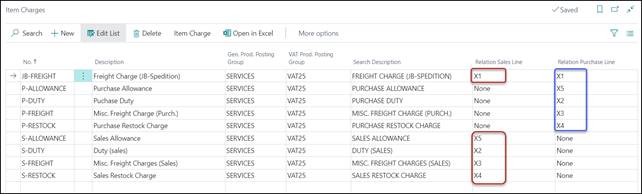
Relation Sales Line
When an Item Charge is calculated for a Sales Line, the
calculated values can be placed in one of the fields X1 (Unit) – X6 (Unit) as
well as the corresponding fields in the range of X1 (Total LCY) – X6 (Total
LCY).
If you for instance enter X1 into this field,
the calculated Item Charge can be placed in X1 (Unit) and X1 (Total LCY).
You cannot enter X1 (or X2, X3, X4, X5 and X6) twice in the
Table on the field Relation Sales Line.
If you enter None, the calculated Item Charge will not be
included in the Sales Line.
You can change the calculated Item Charges on the Sales
Line manually.
NOTE
Keep in mind, that if the pre-defined
fields X1-X6 of the Sales Line are already used for customization, you cannot
use them for the Item Charges.
This also means that you can only use
up to 6 different Item Charges for the Sales Lines.
Relation Purchase
Line
When an Item Charge is calculated for a Purchase Line, the
calculated values will be placed in one of the fields X1 (Unit) – X6 (Unit) as
well as the corresponding fields in the range of X1 (Total LCY) – X6 (Total
LCY).
If you for instance enter X1 into this field,
the calculated Item Charge will be placed in X1 (Unit) and X1 (Total LCY).
You cannot enter X1 (or X2, X3, X4, X5 and X6) more than
once in the Table on the field Relation Purchase Line.
If you enter None, the calculated Item Charge will not be
included in the Unit Cost (LCY) of the Purchase Line. You can change the
calculated Item Charges on the Purchase Line manually.
NOTE
Keep in mind, that if the pre-defined
fields X1-X6 of the Purchase Line are already used for customization, you
cannot use them for the Item Charges.
This also means that you can only use
up to 6 different Item Charges for the Purchase Lines.
The rest of the fields are standard Business
Central fields and will not be described in this White Paper.
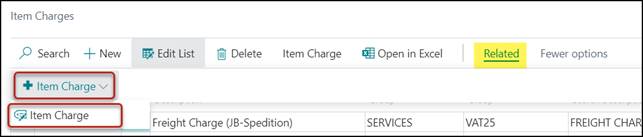
General
Item Charge for Purchase
You can enter Item Charges that are
applicable for all Items and for all Sales and Purchase (if the field Relation
Sales Line and/or Relation Purchase Line differs from None)
by clicking Related, Item Charge, Item Charge.
You can only enter 1 Line per Item Charge
for this general Item Charge.

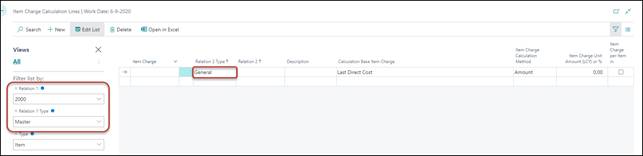
Relation 1 Type and Relation 2 Type
These fields are automatically filled with General
because you came in this page via the Item Charges page. Therefore,
the Relation 1 and Relation 2 should stay empty as well.
Description
The description field will automatically be
filled with the Description of the Item Charge, but you can change the Description
manually to a maximum of 50 characters.
Calculation Base Item Charge
This field determines how the individual
Item Charges are summarized and included in or excluded from subsequently
calculated Item Charges. The Line Nos. of the Item Charge Calculation Lines
sets the sequence: the order in which you create the Lines.
This field can have three different Options
according to the descriptions below and Last Direct Cost can be defined in
different ways depending on the situation.
-
If you are about updating the Calculated Unit
Cost of an Item card, “Last Direct Cost” will mean the Last Direct Cost per
Purchase Unit of Measure of the Item.
-
In case of creating or updating a Purchase Line,
“Last Direct Cost” will mean the Direct Unit Cost per Unit of Measure
on the Purchase Line.
-
If you are about creating a new Item, “Last
Direct Cost” will be the Purchase Price of the primary Vendor of the Master. If
the Master is not included in this price list of the actual Vendor, the program
will use the first Vendor found by a search in table 99 Item Vendor.
You can choose between the following three
options:
|
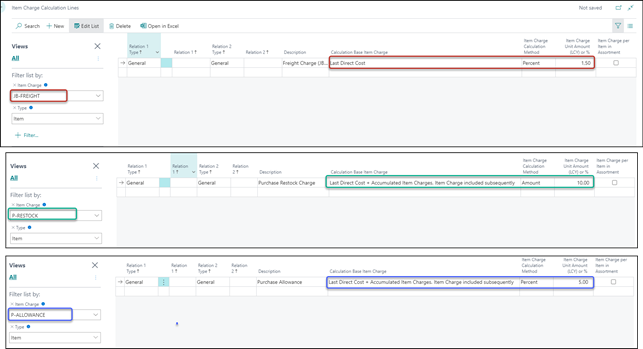
Last Direct Cost
|
The Item Charge calculation will be based
on Last Direct Cost according to the above definitions.
The actual Item Charge will be
included in the calculation base of subsequent Item Charge Calculation Lines
with this field set to either
Last Direct Cost plus Accumulated Item
Charges. Item Charge Included Subsequently
or
Last Direct Cost plus Accumulated Item
Charges. Item Charge NOT Included Subsequently.
|
|
Last Direct Cost plus Accumulated Item
Charges. Item Charge Included Subsequently
|
The Item Charge calculation will be based
on Last Direct Cost according to the above definitions plus
accumulated Item Charges.
The actual calculation base will include
all Item Charges calculated before the actual Item Charge Calculation Line, if
they have this field set to either
Last Direct Cost
or
Last Direct Cost plus Accumulated Item
Charges. Item Charge Included Subsequently.
The actual Item Charge will be included
in the calculation base of subsequent Item Charge Calculation Lines with this
field set to either
Last Direct Cost plus Accumulated Item
Charges. Item Charge Included Subsequently
or
Last Direct Cost plus Accumulated Item
Charges. Item Charge NOT Included Subsequently.
|
|
Last Direct Cost plus Accumulated Item
Charges. Item Charge NOT Included Subsequently
|
The Item Charge calculation will be based
on Last Direct Cost according to the above definitions plus
accumulated Item Charges.
The actual calculation base will include
all Item Charges calculated before the actual Item Charge Calculation Line, if
they have this field set to either
Last Direct Cost
or
Last Direct Cost plus Accumulated Item
Charges. Item Charge Included Subsequently.
The actual Item Charge will not be
included in the calculation base of subsequent Item Charge calculation lines.
|
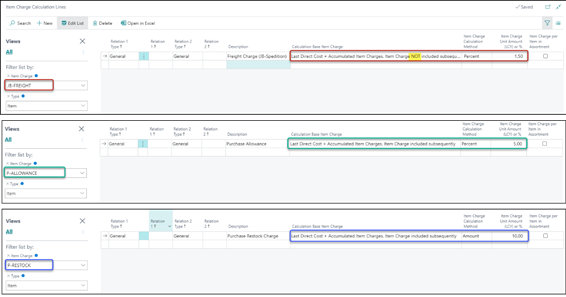
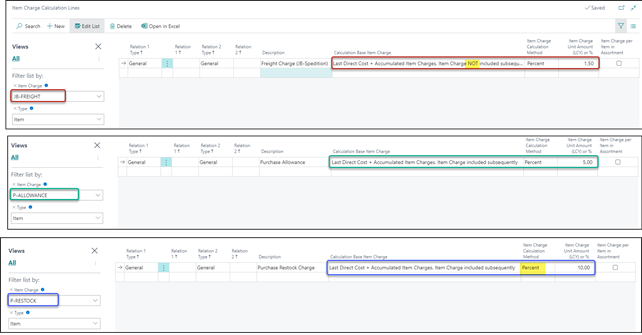
Example 1:
You have three different general Item
Charges set up with the options and order as shown below.
If the Last Direct Cost is 1.000,00,
the Item Charge calculation will be carried out like this:
|
Item Charge
|
Item Charge Calculation Base
|
Item Charge Amount
|
|
JB-FREIGHT
|
1.000,00
|
15,00
|
|
P-ALLOWANCE
|
1.015,00
|
50,75
|
|
P-RESTOCK
|
-
|
10,00
|
|
TOTAL
|
|
75,75
|
Example 2:
You have three different general Item
Charges set up with the options and in the order as shown below.
If the Last Direct Cost is 1.000,00,
the Item Charge calculation will be carried out like this:
|
Item Charge
|
Item Charge Calculation Base
|
Item Charge Amount
|
|
JB-FREIGHT
|
1.000,00
|
15,00
|
|
P-ALLOWANCE
|
1.000,00
|
50,00
|
|
P-RESTOCK
|
-
|
10,00
|
|
TOTAL
|
|
75,00
|
Example 3:
You have three different Item Charges set
up with the options and in the order as shown below.
If the Last Direct Cost is 1.000,00,
the Item Charge calculation will be carried out like this:
|
Item Charge
|
Item Charge Calculation Base
|
Item Charge Amount
|
|
JB-FREIGHT
|
1.000,00
|
15,00
|
|
P-ALLOWANCE
|
1.000,00
|
50,00
|
|
P-RESTOCK
|
1.050,00
|
105,00
|
|
TOTAL
|
|
165,00
|
Item Charge Calculation Method
This field determines whether the Item
Charge filled into the field Item Charge Unit Amount (LCY) or % field is
a fixed Amount per unit or a Percentage to calculate the amount per unit.
You can choose between the following two
options:
|
Percent
|
The entry in Item Charge Unit Amount
(LCY) or % will be a Percentage.
|
|
Amount
|
The entry in Item Charge Unit Amount
(LCY) or % will be an Amount per unit
|
Item Charge Unit Amount (LCY) or %
Here you enter the Item Charge value. If
the Item Charge Calculation Method field is set to Amount, the
value of this field will be regarded as an Item Charge Unit Amount.
If the Item Charge Calculation Method
field is set to Percent, the Item Charge Unit Amount will be calculated
by using the formula:
Item Charge Unit Amount (LCY) or % * Calculation Base Item Charge / 100
NOTE
Keep in mind, that if you use Item
Charge Calculation Method is Amount, that the Item Charge Unit
Amount (LCY) or % is always in your local currency!
Item Charge per Item in Assortment
Especially if you have an Item Charge with
an Item Charge Calculation Method is Amount, you need to
determine if this Amount is applicable on a complete Assortment, or if it is
applicable for every Item in the Assortment.
I.e.: If an Assortment contains 8 Items,
and the Item Charge Unit Amount (LCY) is set to 0,25; should the
system calculate 0,25 for the whole Assortment, or 8 * 0,25 = 2,00 for
the whole Assortment.
A checkmark in this field will calculate
the 2,00 from the example above.
Besides general Item Charges, you are also
able to specify the Item Charges for:
Items, Masters, Vendors, Territories,
Country/Regions and even more detailed, i.e. per Vendor/Master etc.
You can enter it the same way as in General Item Charge, but the pre-defined
filters are different.
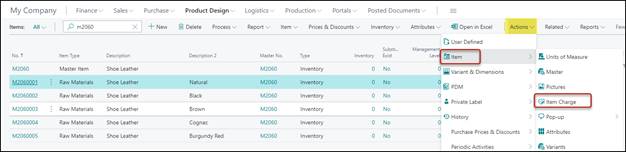
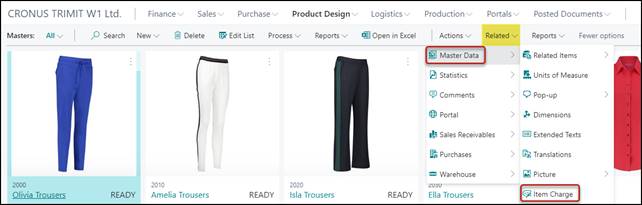
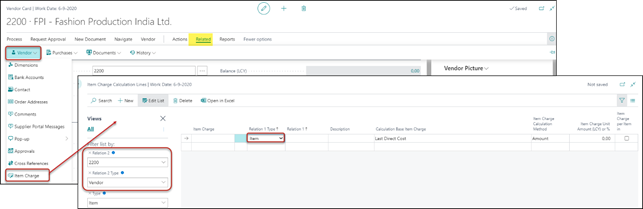
In the Items List, by clicking Actions,
Item, Item Charge you can enter the Item Charges.
Alternatively, via a specific Item Card,
by clicking Related, Item, Item Charge you can
enter the Item Charges.
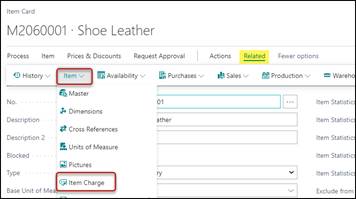
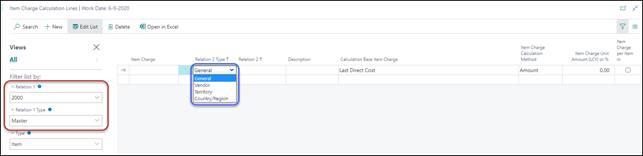
This will open the Item Charge Calculation
Lines: 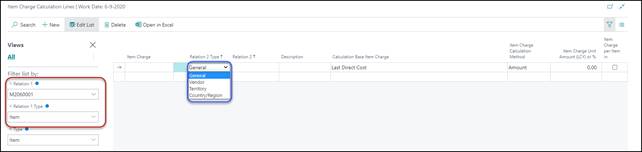
Now you can enter the Item Charges the same
way as in General Item Charge.
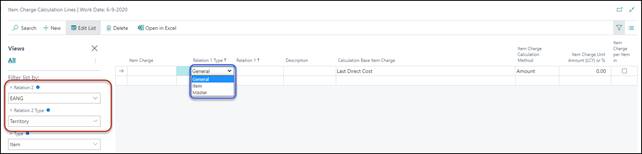
Per Item, you can create Item Charge
Calculation Lines per Item Charge for all Vendors, Territories and Country/Region
but also for specific Vendors, Territories or Country/Region.
This can be done by using the Relation 2
Type and entering specific values in Relation 2.
You can follow a similar procedure if you
want to open the Item Charge Calculation Lines from one of the other
related tables being:
Via the Master List or Master Card by
clicking Related, Master Data, Item Charge
Now you can enter the Item Charges the same
way as in General Item Charge.
Per Master, you can create Item Charge
Calculation Lines per Item Charge for all Vendors, Territories and
Country/Region but also for specific Vendors, Territories or Country/Region.
This can be done by using the Relation 2
Type and entering specific values in Relation 2.
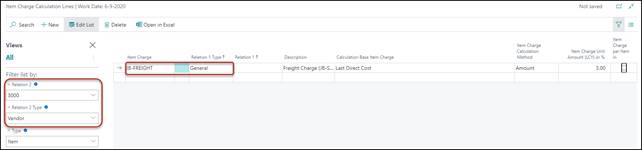
Via the Vendors List or Vendor Card by
clicking Related, Vendor, Item Charge
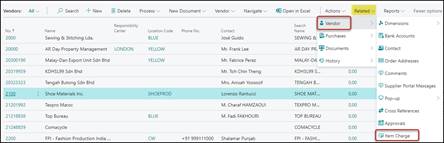
Per Vendor, you can create Item Charge
Calculation Lines per Item Charge for all Items and Masters but also
for specific Masters and/or Items.
This can be done by using the Relation 1
Type and entering specific values in Relation 1.
Via the Territories List by clicking Related,
Territories, Item Charge
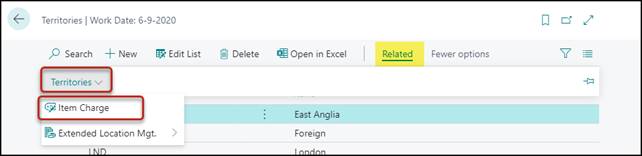
Per Territory, you can create Item
Charge Calculation Lines per Item Charge for all Items and Masters
but also for specific Masters and/or Items.
This can be done by using the Relation 1
Type and entering specific values in Relation 1.
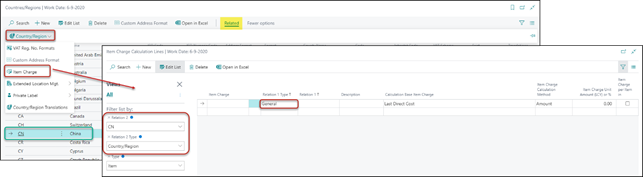
Via the Countries/Regions List by clicking Related,
Country/Region, Item Charge

Per Country/Region, you can create Item
Charge Calculation Lines per Item Charge for all Items and Masters
but also for specific Masters and/or Items.
This can be done by using the Relation 1
Type and entering specific values in Relation 1.
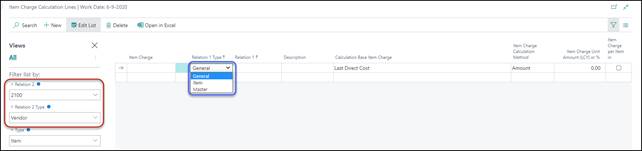
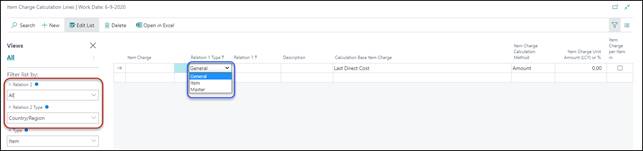
When an Item Charge is to be calculated, it
is always found based on a combination of Relation 1 (Type) and Relation
2 (Type) as exemplified below:
The options are:
Relation 1 Type can be General, Item and Master
Relation 2 Type can be General, Vendor, Territory and
Country/Region
In addition, you can have a combination of Relation
1 Type + Relation 2 Type; therefore 12 different combinations to
define specific Item Charges.
Example 4:
You have an Item Charge related to
everything purchased from a specific Country/Region.
Then you could create this Item Charge via
the Countries/Regions.
In the Item Charge Calculation Lines, you
select General for Relation Type 1.
This Item Charge will be activated whenever
you purchase an Item in this specific Country/Region or whenever you create an
Item based on a Master related to this specific Country/Region, unless you have
another Item Charge with higher search priority (see Search
Priority).
Example 5:
You have an Item Charge related to a
specific Item but only if the Item is purchased from a specific Vendor.
In this case, you will need to create an
Item Charge from the Vendor and in the Item Charge Calculation Lines; you
select Item for Relation Type 1.
This Item Charge will be activated whenever
you purchase a specific Item from this specific Vendor. The combination Item /
Vendor has the highest search priority so any other Item Charge cannot replace
it.
Example 6:
You have an Item Charge related to a
specific Master regardless of where the related Items are purchased.
Here you will need to create an Item Charge
from the specific Master.
Then this Item Charge will be activated
when you create a new Item based on this Master or when you buy an Item related
to the Master unless the program is able to find another Item Charge with
higher search priority (see Search Priority).
When you access the Item Charge Calculation Lines from a
Master or Item, the program knows that the Item Charge is related to the actual
record and the Master or Item No. will be filled in automatically in the Filter
of the page.
The program will be able to handle
different Item Charges but only at one single level per Item.
If you for instance have a specific Item
Charge depending on the Master, you need to create all your Item Charge Calculation
Lines in relation to your Masters for that specific Item Charge.
If you in addition to this, have another
Item Charge depending on specific Items, you cannot just create these Item
Charge Calculation Lines in relation to the Items and keep the aforementioned
related to your Masters.
In this case, you will have to move all
Item Charge Calculation Lines to the Item level.
In other words, you will have to choose one
of the 12 levels mentioned below in the paragraph Search
Priority and create all you Item Charges at this level.
Search Priority
The program will search for a related Item
Charge when a Purchase Line is created or when the unit cost is calculated in
connection with creation of a new Item. By this search, Relation 1 (what) has
the higher priority and Relation 2 (where) the lower priority, meaning that the
search priority will be as listed in the following table:
|
Sorting
|
Relation
1 (what)
|
Relation
2 (where)
|
|
1
|
Item
|
Vendor
|
|
2
|
Item
|
Territory
|
|
3
|
Item
|
Country/Region
|
|
4
|
Item
|
General
|
|
5
|
Master
|
Vendor
|
|
6
|
Master
|
Territory
|
|
7
|
Master
|
Country/Region
|
|
8
|
Master
|
General
|
|
9
|
General
|
Vendor
|
|
10
|
General
|
Territory
|
|
11
|
General
|
Country/Region
|
|
12
|
General
|
General
|
The program will start
by looking for the 1st combination Item/Vendor and if it
cannot be found, the program will continue searching for the 2nd
combination Item/Territory etc. until an existing
combination is found.
Example 7:
If I have Item Charge Calculation Lines for
a specific Vendor 3000. Therefore priority 9:
In addition, I have Item Charge Calculation
Lines for Master M3010. Therefore priority 8:

In a Purchase Line with Vendor 3000
and Item M30100110B (if Base Calc. Unit Cost Material is set
to Last Direct Cost + Item Charges) and Item M30200110 (if Base
Calc. Unit Cost Material is set to Last Direct Cost + Item Charges)
it will look as follows:
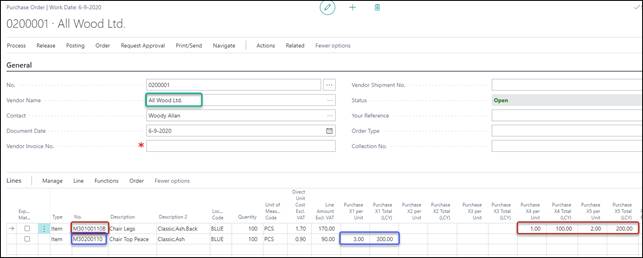
Regardless the Item Charges you
created in the Item Charge Calculation Lines for the specific Search
Priorities: the system will take ALL the Item Charges of one specific Search
Priority per Item and will not determine per Item Charge which Search
Priority to take!
Therefore, for M301001108 the Item
Charges are taken that are entered on Master M3010.
For Item M302000110 the Item Charges
are taken that was entered on Vendor 3000.
NOTE
That specific Item Charges are
shown in specific X1, X2, X3, X4, X5 fields is determined via the Relation
Purchase Line field of the Item Charge. See Relation
Purchase Line
The Calculated Unit Cost fields of an Item are
shown on the FastTab Costs of the Item card.
If the field Base Calc. Unit Cost
Material is set to either Last Direct Cost + Item Charge the
calculated Item Charge will be included in the Calculated Unit Cost of Materials.
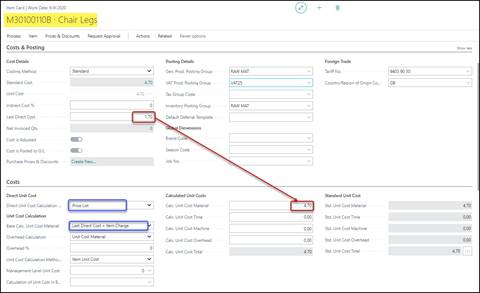
Based
on previous entered Item Charges in the Demo Company, and after running the Unit
Cost Revaluation Update for M30100110B.
The Calculated Unit Cost of the Item is
calculated by creation of the Item. It is calculated based on the Purchase
Price list of the primary Vendor of the Master – because Direct Unit Cost
Calculation Method is usually set to Price List.
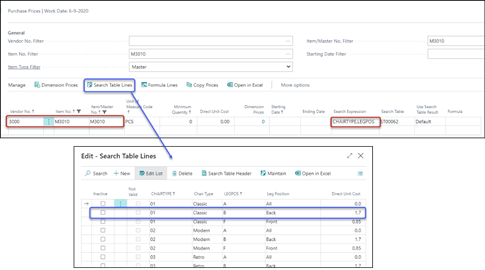
For
Master M3010, it is based on a Search Table.
If the Master is not found in this price
list of the actual Vendor, the program will use the first Vendor found by a
search in table 99 Item Vendor.
Purchase
Every time Last Direct Cost of an
Item is updated, the Calculated Unit Cost of the Item is recalculated including
recalculation of the Item Charges.
This means that the Calculated Unit Cost of
the Item card is recalculated every time a Purchase Line is posted to the Item.
Value Entries
in case of Costing Method = Standard
An Item Ledger Entry can have three Item
Value Entries attached having the entry types Direct Cost, Indirect
Cost and Variance, respectively.
Direct Cost
The value entry with entry type Direct
Cost shows the cost that can be traced directly to the cost object
(Purchase Price).
Indirect Cost
The value entry with entry type Indirect
Cost shows the total indirect cost of the Item Ledger Entry. This total
Indirect Cost will only be based on the standard Business Central Indirect
Cost %.
Variance
The value entry with entry type Variance
shows the difference between the Standard Cost and the Direct Unit Cost –
Indirect Cost % (of standard Business Central).
Example 8:
As seen earlier, if Item M30100110B has:
-
Direct Unit Cost 1,70
-
Base Calc. Unit Cost Material Direct Unit Cost + Item Charge
-
Calc. Unit Cost Material 4,70
-
Std. Unit Cost Material 4,70
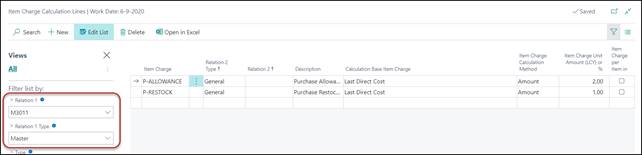
If Master M3010 has Item Charges:
If we have a Purchase Line – where we
change the Direct Unit Cost Excl. VAT from 1,70 to 1,80:
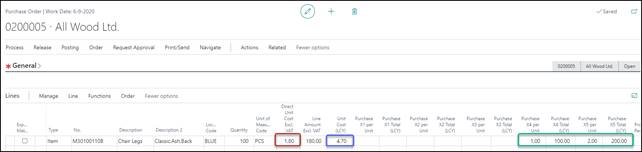
We will see, that the (calculated) Unit
Cost (LCY) for this Purchase Line is still 4,70.
If we post this Purchase Line (receive and
invoice), the Item Ledger Entry – which can be found by clicking Receipt,
Find Entries in the Posted Receipt – will look like:

The Cost Amount (Actual) is based on
the Std. Unit Cost Total of the Item; this will not be influenced by the
Purchase Price or Item Charges on the Purchase Line.
The Value Ledger Entries – which can
be found by clicking Invoice, Find Entries in the
Posted Invoice – will look like:

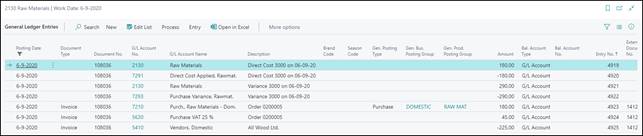
On the Direct Cost line, you see Cost
Amount (Actual)
180,00 è 100 * 1,80
(Purchase Price)
On the Indirect Cost line, you see Cost
Amount (Actual)
300,00 è 100 * 1,00
(P-RESTOCK) + 100 * 2,00 (P-ALLOWANCE)
On the Variance line, you see Cost
Amount (Actual)
300,00 – 10,00 è 290,00
300,00 è 100 * 1,00
(P-RESTOCK) + 100 * 2,00 (P-ALLOWANCE)
-10,00 è Difference
between Std. Unit Cost Total of the Item (which is 4,70) and the Calculated
Unit Cost based on the Purchase Price of the Invoice and the Item Charges.
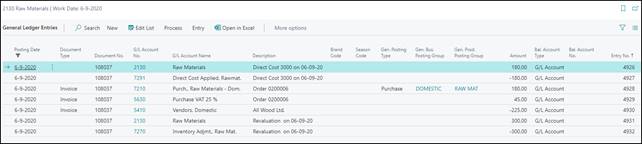
The G/L Entries – which can be found
by clicking Invoice, Find Entries in the Posted Invoice – could
look like:

An Item Ledger Entry can have three Item
Value Entries attached having the entry types Direct Cost, Indirect
Cost and Revaluation, respectively.
Direct Cost
The value entry with entry type Direct
Cost shows the cost that can be traced directly to the cost object
(Purchase Price).
Indirect Cost
The value entry with entry type Indirect
Cost shows the total indirect cost of the Item Ledger Entry. This total
Indirect Cost will only be based on the standard Business Central Indirect
Cost %.
And it is not possible to fill the Indirect Cost % if Base Calc. Unit Cost Material has been
set to Direct Unit Cost + Item Charge!
Revaluation
The value entry with entry type Revaluation
shows the amount of the TRIMIT Item Charges.
Example 8:
Item M30110110B has:
-
Direct Unit Cost 1,70
-
Base Calc. Unit Cost Material Direct Unit Cost + Item Charge
-
Calc. Unit Cost Material 4,70
If Master M3011 (copy of M3010 with Costing
Method = FIFO) has Item Charges:
If we have a Purchase Line – where we
change the Direct Unit Cost Excl. VAT from 1,70 to 1,80:
We will see, that the (calculated) Unit
Cost (LCY) for this Purchase Line is now also updated to 4,80.
If we post this Purchase Line (receive and
invoice), the Item Ledger Entry – which can be found by clicking Receipt,
Find Entries in the Posted Receipt – will look like:

The Cost Amount (Actual) is based on
the Direct Unit Cost + the Item Charges on the Purchase Line.
The Value Ledger Entries – which can
be found by clicking Invoice, Find Entries in the
Posted Invoice – will look like:

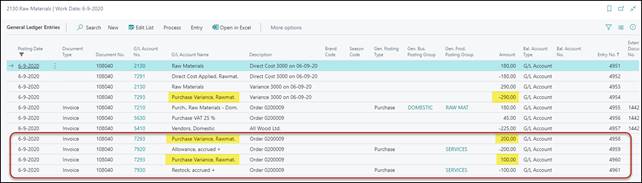
On the Direct Cost line, you see Cost
Amount (Actual)
180,00 è 100 * 1,80
(Purchase Price)
On the Revaluation line, you see Cost
Amount (Actual)
300,00 è 100 * 1,00
(P-RESTOCK) + 100 * 2,00 (P-ALLOWANCE)
The G/L Entries – which can be found
by clicking Invoice, Find Entries in the Posted Invoice – could
look like:
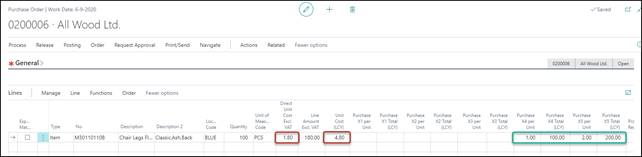
The Direct Unit Cost of the Purchase
Line is calculated automatically based on the Purchase Price found by a normal
price search. The Item Charge is calculated based on this Direct Unit Cost.
When an Item Charge is calculated for a
Purchase Line, the values are placed in the fields X1-X6 (Unit) in the Currency
of the Vendor and X1-X6 (Total LCY). Where to place the Item Charge, is set up
in the Relation Purchase Line field of the Item Charges page (to
be found via Tell me Item Charge).
If the value None is
selected, the Item Charge will not be included in the Unit Cost of the Purchase
Line, but only be used to calculate or recalculate the Unit Cost of Items.
When a Purchase Line has been created and
the Item Charges have been calculated and placed in the X fields, you can
change the values manually. If you change the Item Charge Unit Amount – in the
X1 – X6 (Unit) fields - the Item Charge Total Amount - in the X1 – X6 (Total
LCY) fields - will be changed accordingly and vice versa.
It is possible to change captions of the X
fields on the Purchase Line if you want more informative names, explaining what
the fields are used for
Example 9:
Via Tell me Caption Class Setup ,
you can enter the Captions for the Purchase X1 – X6 fields:
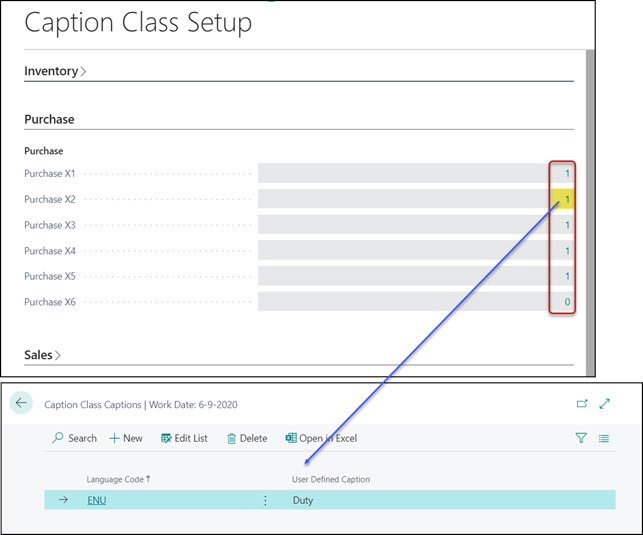
This will result in i.e.:
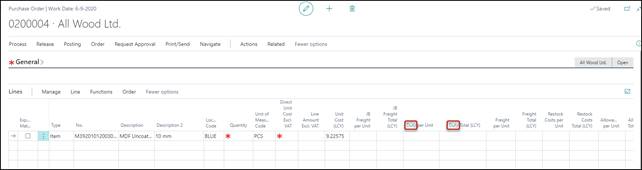
This is also applicable for all other
Purchase Document Lines that included the X1 – X6 fields, like i.e. Purchase
Quote Line, Posted Purchase Invoice Line, etc.
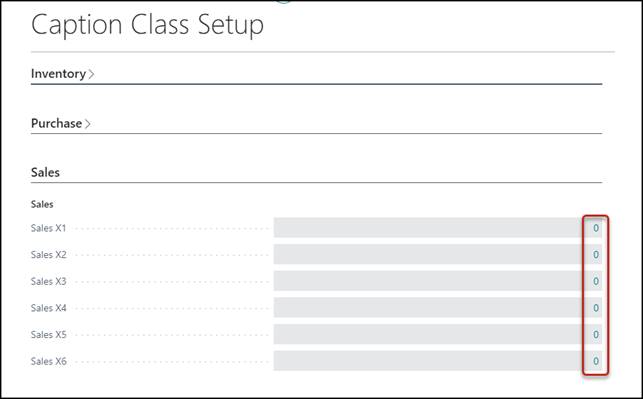
The same can be done for the X1 – X6 fields
in the Sales Line.
Via Tell me Caption Class Setup ,
you can enter the Captions for the Sales X1 – X6 fields:
If the Item Charge of a Purchase Line has
been changed manually, a check mark will be set in the field Freeze X
Fields, meaning that change or update of the Purchase Line will not lead
(again) to a recalculation of the Item Charge.
Only if the No. field is changed or
updated, the check mark will be removed and the Item Charge recalculated.
The check mark can be removed manually if
you want an Item Charge recalculation by the next change or update of the
Purchase Line.

You can set up the program to post ‘reservations’
for the Item Charge amounts to the General Ledger when the Purchase Lines or
Sales Lines (of the Items) are posted. You can read more about provision in the
white paper TRIMIT Provision.
Example 10:
The G/L Entries based on a Purchase Invoice
mentioned on page 17:
Could also look as follows, with the right
setup of TRIMIT Provision Purchase:

 WHITE PAPER