TRIMIT Replacements enables you to replace
Masters/Items on Sales Lines (Sales Quote Lines, Sales Order Lines, and
Sales Blanket Order Lines) with other Masters/Items in an effortless way.
This functionality can also be used to update Sales Prices, Sales
Line Discounts, Location Code, Shipment Date, and/or Period Code in existing Sales
Lines.
This functionality can also be used to delete open Sales
Lines.
Within Fashion, it is quite common to decide during the
pre-sales period, which Items will be taken out of a Collection because of Minor
Sales.
In that case, with TRIMIT Replacement, you can
exchange Items by other Items or delete the original Sales Lines for these
Items.
Also changing i.e., the Shipment Dates – based on delayed
Receipts or Production – is usually a big issue, if the Sales Order has been
entered 3 or 4 months before the delivery.
In that case, with TRIMIT Replacement, you can update
the Shipment Date and/or Period Code of Sales Lines.
Note
Because the Replacement functionality is mainly used in
Fashion, in this White Paper the examples and text will be related to Colors
and Sizes. Keep in mind that the Color is the VarDim Type of Variant 1 of a
Master, and the Size is the VarDim Type of Variant 2 of a Master, but it can
also be something completely different then Colors and Sizes.
The TRIMIT Replacement can only
be used for Items and Matrix Masters.
It can not be used for
Configurable Items which results in VarDim Order Lines in a Sales Order.
The audience for this document is the Consultant or very
skilled User.
Be aware of not changing settings and parameters in a live
database without consulting the implementing partner.
The functionality described is the
functionality as of TRIMIT 24.1 for Business Central W1 BC24.X.
The pictures in this White Paper
are based on the demo database for TRIMIT 24.1, which is based on
Microsoft Dynamics 365 Business Central 2024 Release Wave 1, in the demo
company CRONUS TRIMIT W1 Ltd. (based on CRONUS International Ltd. of
Microsoft Dynamics 365 Business Central).
TRIMIT Replacements uses the following objects:
The tables 6037122 trm
Replacement Header
6037123 trm
Replacement Lines
6037124 trm
Replacement Sales Line
The pages 6036849
trm Replacement Totals Factbox
6037143 trm
Replacement List
6037145 trm
Replacement Header
6037146 trm
Replacement Line
6037147 trm
Replacement Dialog
6037148 trm
Replacement Sales Line
The reports 6037122 trm
Replacement Statistic
6037123
trm Replacement Call List
The Codeunit 6037135 trm Replacement
Handling
The Query 6036861
trm Replacement LookUp Query
Other object will be changed as well regarding TRIMIT Replacement,
but the above-mentioned objects are the specific object for this subject.
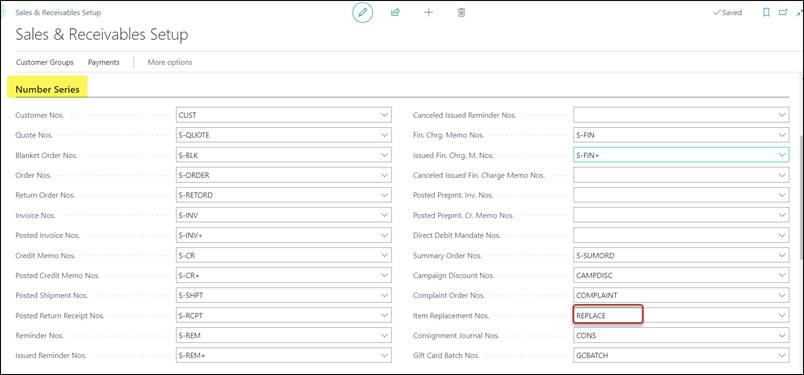
For the TRIMIT Replacements a Number Series is
necessary which can be entered in the Sales & Receivables Setup via Tell
me Sales & Receivables Setup.
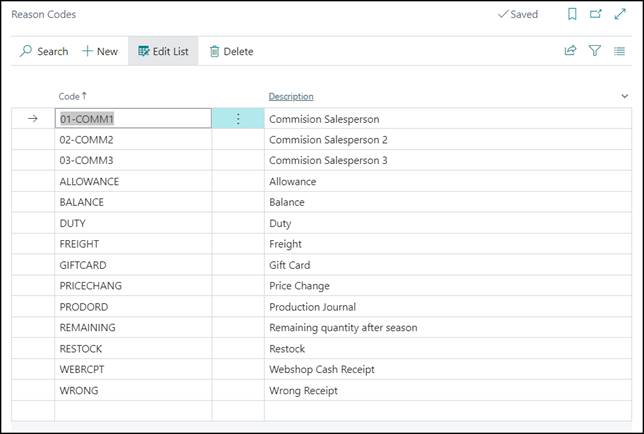
Every Replacement can have a specific Reason Code,
which determines why a Replacement takes place. These Reason Codes can
be entered via Tell me Reason Codes (the standard BC Reason
Codes)
The process of a Replacement contains a few steps:
1) Create a Replacement
Header.
2) Enter
the Filters to create the Replacement Lines and for filtering the Sales
Lines that needs to be changed.
3) Enter
the information you want to change (if applicable).
4) Create
(or enter manually) the Replacement Lines in which you determine which
Items must be replaced or deleted in Sales Lines or for which Items the fields
in the Sales Lines should be updated.
5) Approve
the Replacement Lines that you want to execute.
6) Based
on the filters the Sales Lines (Sales Quote Lines, Sales Order Lines,
and/or Sales Blanket Order. Lines) can be created that needs
to be updated/replaced/deleted. The user is still able to change the Action
that needs to be conducted for these Sales Lines (Replace, Delete, None,
Update, Partly Replace).
7) Post
the Replacement Header, which means that the original Sales Lines will be
updated or will be deleted, and new Sales Lines can be created – in case of a
replace.
There are reports that can be used to inform your customer.
Via Tell me Replacement you can open the Replacement
List.

With click +New, you can create a new
Replacement.
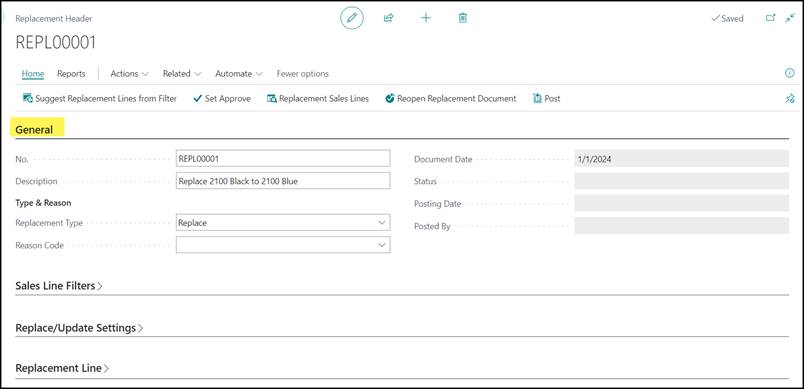
No.
Can be generated automatically based on the Number Series in
the Sales & Marketing Setup or entered manually. You can call
this the reference number for this Replacement.
Description
Description of this Replacement
Replacement Type
The Replacement Type determines what you want to do,
and what you need to enter on the Replacement Lines. You can choose
between the following three options:
|
Replace
|
This option will replace the From No. to the To
No. of the Replacement Lines in the selected Sales Lines. In addition, it
will also update the new to be created Sales Lines based on the fields on the
FastTab Replace/Update Settings.
From No. and To No. must be filled in the
Replacement Lines.
|
|
Update
|
This option will only update the selected Sales Lines with
the From No. of the Replacement Lines based on the fields on the
FastTab Replace/Update Settings.
From No. must be filled in the Replacement Lines.
|
|
Delete
|
This option will delete the selected Sales Lines with the From
No. of the Replacement Lines.
From No. must be filled in the Replacement Lines.
If a part of the Sales Line was already shipped, the Quantity
will be changed to the Shipped Quantity and Outstanding
Quantity of the Sales Line will be set to Zero (0).
|
Reason Code
You can enter a Reason Code for this Replacement,
which can be chosen out of the standard BC Reasons.
This will be copied to the Replacement Lines but can be
changed on individual Lines.
Document Date
Will be filled automatically with the Work Date when
creating the Replacement.
Status
Will be set by the system automatically based on the Actions
you conduct.
It can get the following values:
|
<empty>
|
New Replacement.
|
|
Active
|
There are Replacement Sales Lines connected to this
Replacement and the Replacement Lines cannot be changed anymore unless
you click (Home), Reopen Replacement Document.
|
|
Posted
|
After the Replacement has been posted: You cannot change
the Replacement anymore.
|
Note
If no Replacement Sales Lines have been connected, the Status
will remain blank.
Posting Date
Will be filled by the system with the Work Date when
the Replacement has been posted.
Posted By
Will be filled by the system with the User that
posted the Replacement.
FastTab Sales Line
Filters
With the fields in this FastTab, you can create Replacement
Lines where the From No. will be based on the existing Sales Lines
according to these filters.
These filters will also be used to determine the Replacement
Sales Lines that you want to replace/update/delete.

Quotes
A checkmark in this field will include Sales Quote Lines in
the Sales Lines that you want to replace/update/delete.
Orders
A checkmark in this field will include Sales Order Lines in
the Sales Lines that you want to replace/update/delete.
Blanket Orders
A checkmark in this field will include Blanket Sales Order
Lines in the Sales Lines that you want to replace/update/delete.
Note
Quotes, Orders and Blanket Orders will all have a
checkmark by default when creating a Replacement Header.
Master No. Filter
In this field, you can enter a filter for the Master
Numbers for creating the Replacement Lines and creating the Replacement
Sales Lines that you want to replace/delete/change.
Item No. Filter
In this field, you can enter a filter for the Item
Numbers for creating the Replacement Lines and creating the Replacement
Sales Lines that you want to replace/delete/change.
Location Code
In this field, you can enter one Location Code as a
filter for creating the Replacement Lines and creating the Replacement Sales
Lines that you want to replace/update/delete.
Brand Code (= Global Dimension 1 Code
In this field, you can enter one Global Dimension 1 Code
(in our Demo Company it has been set as Brand Code) as a filter for
creating the Replacement Lines and creating the Replacement Sales Lines that
you want to replace/update/delete.
Season Code (=Global Dimension 2 Code
In this field, you can enter one Global Dimension 2 Code
(in our Demo Company it has been set as Season Code) as a filter for
creating the Replacement Lines and creating the Replacement Sales Lines that
you want to replace/update/delete.
Order Type
In this field, you can enter one Order Type as a
filter for creating the Replacement Lines and creating the Replacement Sales
Lines that you want to replace/update/delete.
Collection No.
In this field, you can enter one Collection No. as a
filter for creating the Replacement Lines and creating the Replacement Sales
Lines that you want to replace/update/delete.
It will check the Collection No. in the Sales Lines.
Period Code
In this field, you can enter one Period Code as a
filter for creating the Replacement Lines and creating the Replacement Sales
Lines that you want to replace/delete/change.
It will check the Period Code in the Sales Lines.
Note
The lookup (Alt+Arrow Down) in this Field depends on
the content of the Collection No.:
If the Collection No. is filled, it will show a list
of all Delivery Periods connected to this Collection No.
If the Collection No. is empty, it will show a list of
the Shipment Groups.
Shipment Date Start
In this field, you can enter one Shipment Date that,
together with the Shipment Date End, will filter Sales Lines for
creating the Replacement Lines and creating the Replacement Sales
Lines that you want to replace/update/delete.
After entering the Shipment Date Start, the Shipment
Date End will be updated with the same value.
Shipment Date End
In this field, you can enter one Shipment Date that,
together with the Shipment Date Start, will filter Sales Lines for
creating the Replacement Lines and creating the Replacement Sales
Lines that you want to replace/update/delete.
After entering the Shipment Date End, the Shipment
Date Start will be updated with the same value if the Shipment Date
Start is later than the Shipment Date End.
Status Code
In this field, you can enter one Status Code as a
filter for creating the Replacement Lines and creating the Replacement
Sales Lines that you want to replace/update/delete.
If you have entered a Collection No. and a Status
Code, the system will check the Status Code in the Collection/Master
Relations - with that Collection.
If you have entered a Collection No. and a Period
Code and a Status Code, the system will check the Status Code in
the Collection/Master Relations – with that Collection and Period.
If you have entered a Period Code (and no Collection
No.) and a Status Code, the system will check the Status Code in
the Matrix Limitation Master Relation.
If no Collection No. and/or Period Code has
been entered, but you did enter a Status Code, the system will check the
Status Code of the Item in a Sales Line based on the Status Code in the
Item, Master Y-Axis, or Master.
No Valid Combinations
Entering a checkmark in this field, will set an extra filter
on the Suggest Replacement Lines from Filter and therefore also on the Replacement
Sales Lines based on the Status Code of the Master/Item/Collection
Master Relations.
If you fill the filter for a Collection No. and set Not
Valid Combinations to Yes, the Actions for Suggest Replacement
Lines and Replacement Sales Lines, will filter on the Master
Relations of a Collection that does have a Status Code for which Sales
Orders/Quotes/Blanket Orders are not available.
If you did not fill the filter for a Collection No.,
it will filter on the Status Code on the Master, Master/Variant 1
(Color) or Master Cell for which Sales Orders/Quotes/Blanket Orders are not
available.
Especially after many Pre-Sales Orders have been entered,
and the Sales Department decides to take some Masters/Colors out of the
Collection No. and/or change the Status Code, this field can be especially
useful to delete the existing Sales Lines or to replace them by another Color.
On this FastTab, you can enter the fields/values that should
be updated in existing (Replacement Type is Update) or new
created (Replacement Type is Replace) Sales Lines when
Posting the Replacement.
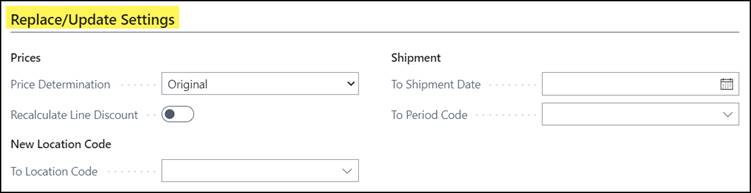
Price
Determination
Here you decide what the Unit Price will be for the
replaced/updated Sales Lines.
You can choose between the following four options if Replacement
Type is Replace:
|
Original
|
The new Sales Line (with a different Item) will get the
same Unit Price as the original Sales Line.
|
|
New
|
The new Sales Line will get the Unit Price of the new Item.
|
|
Highest
|
The new Sales Line will get the highest Unit Price (of the
original Item or the new Item).
|
|
Lowest
|
The new Sales Line will get the lowest Unit Price (of the
original Item or the new Item).
|
You can choose between the following four options if Replacement
Type is Update:
|
Original
|
Nothing will change
|
|
New
|
Unit Price in the Sales Line will be updated with the
current Sales Price
|
|
Highest
|
Unit Price in the Sales Line will be updated with the
current Sales Price, if the current Sales Price is higher as the Unit Price
in the Sales Line.
|
|
Lowest
|
Unit Price in the Sales Line will be updated with the
current Sales Price, if the current Sales Price is lower as the Unit Price in
the Sales Line.
|
Recalculate
Line Discount
In case of Replacement Type is Replace, with a
checkmark you can determine if the Line Discount % of the new Sales Line should
be calculated based on the new Item – instead of keeping the Line Discount % of
the current Sales Line with the old Item.
In case of Replacement Type is Update, with a
checkmark you can determine if the Line Discount % should be recalculated in
existing Sales Lines.
To Location Code
In this field, you can enter a Location Code that should
replace the Location Code in the selected Sales Lines. This can be applicable
for Replacement Type Replace and Update.
Note
If this To Location Code has been setup to use Bin
Codes, also the field Bin Code in the new or updated Sales Lines might
be updated. You can see this in the Replacement Sales Lines in the field
To Bin Code (Expected) which is not by default shown in the page.
To Shipment date
In this field, you can enter a Shipment Date that should
replace the Shipment Date in the selected Sales Lines. This can be applicable
for Replacement Type Replace and Update.
To Period Code
In this field, you can enter a Period Code that should
replace the Period Code in the selected Sales Lines. This can be applicable for
Replacement Type Replace and Update.
If you did enter a Collection No. on the FastTab Sales Line Filters, a lookup (Alt+Arrow
Down) will only show the Delivery Periods connected to that Collection
No. After choosing the Delivery Period, the To Shipment Date will
automatically be filled with the Start Sales Delivery Period of that Delivery
Period.
If you did not enter a Collection No. on the FastTab Sales Line Filters, a lookup (Alt+Arrow
Down) will only show the Shipment Groups. After choosing the Shipment
Group, the To Shipment Date will automatically be filled with the Start
Shipment Date of that Shipment Group.
You can create the Replacement Lines manually or by
using the Action Suggest
Replacement Lines from Filter.

Regardless the Replacement Type (Replace, Update,
Delete), only the From No. information will be filled automatically
based on the filters you have entered on the FastTab Sales Line Filters.
The To No. information then still needs to be entered
manually.
You can also create the complete Replacement Lines manually
without using the above Action.
You can enter Replacement Lines per Item, Matrix,
or Assortment Matrix.
I.e., you could use Item, when you only want to replace/update/delete
a specific color/size of a Master, but when you want to replace/update/delete a
complete Master or all the Sizes XS from a Master or a complete Color Black
from a Master it is better to use the Matrix.
Assortment Matrix Lines can be used when you want to replace/update/delete
specific Assortments of a Master.
Note
Where you see the explanation for Variant 1 and Variant 2,
you can extend it with Variant 3, 4, 5, 6, 7, 8 and 9.
They are however not by default shown in the page.
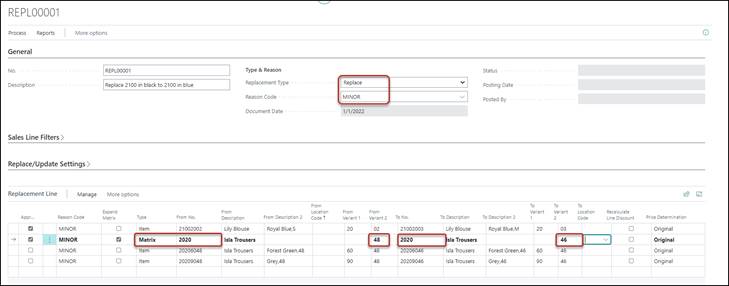
Replace and Update an Item
If you only want to replace or update a combination of a
Master/Color/Size (Master/Variant 1/Variant 2), a single Item, you can enter
the information as shown in the screenshot below:
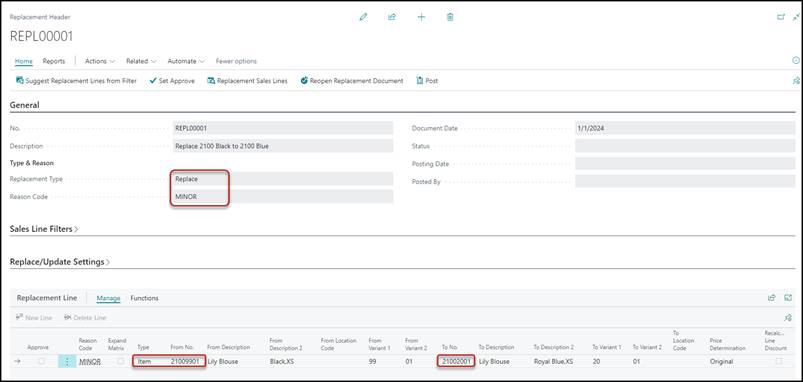
In FastTab General, the Replacement Type needs to be filled
and you can enter a Reason Code.
A Reason Code in the Header will be copied to the Replacement
Lines but can be overwritten.
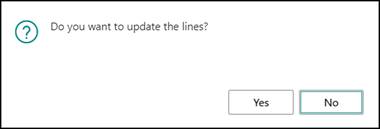
If you already created Replacement Lines when
entering a Reason Code, a message will appear to determine if the existing
Replacement Lines should be updated:
Description of Fields
Approve
You need to put a checkmark in the field Approve, if
you want this Replacement Line to be Posted (executed) and to see the Sales
Lines involved.

This can also be done by clicking Process, Set Approve
for all the Lines at once.
Type
In this case, you chose Item.
From No.
The Item Number you want to replace or update.
After entering the From No., the From Variant 1 and
From Variant 2 will be shown, as well as the From Description and
From Description 2 (if you added it to the page by using Personalization).
Note
From Variant 3 – 9 will be filled if applicable and part of the Item
Number, but you need to add these fields to the page by using Personalization
if you want to see them.
Pressing Alt+Arrow Down (lookup) in this field, will
only show the Items for which there are open Sales Lines in the system that do
comply to the Filters you entered in the FastTab Sales
Line Filters.
If you however entered an Item No., for which there are no
open Sales Lines; you will get a message:
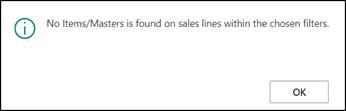
To No.
New Item that can replace the From No.
After entering the To No., the To Variant 1 and
To Variant 2 will be shown, as well as the To Description and To
Description 2 (if you added it to the page by using Personalization).
Note 1
To Variant 3 – 9 will be filled if applicable and part of the Item
Number, but you need to add these fields to the page by using Personalization
if you want to see them.
Note 2
If you did have a Collection No. filled in the FastTab
Sales Line Filters as a Filter, also the To No. must
be connected to that Collection No.
Price Determination
This field can be added via Personalization.
You can change the content of the field for a specific
Replacement Line. Default is the Price
Determination of the Header of the Replacement.
Recalculate Line Discount
This field can be added via Personalization.
You can change the content of the field for a specific
Replacement Line. Default is the Recalculate
Line Discount of the Header of the Replacement.
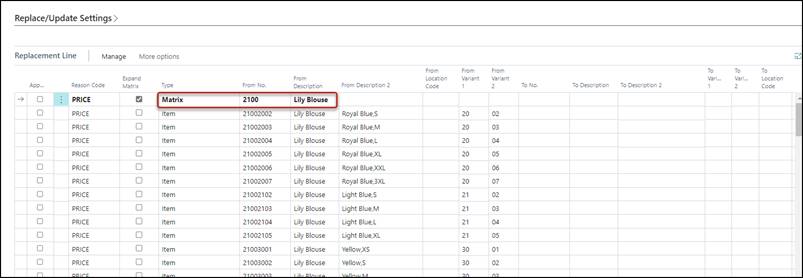
Replace and Update
Color, Size, or Assortment of Masters
If you want to replace or replace and update a complete
Color or Size of a Master or if you want to replace a complete Master or
Assortment of a Master, you can enter all the related Items individually as
shown before.
It is however much easier to use the Replacement Line Type
Matrix or Assortment Matrix instead.
Description of Fields
Replacement Type
This needs to be filled with Replace if you
want to replace From No. to To No.
Reason Code
Information that can be used for the Statistics of the Replacements.
A Reason Code in the Header will, by default, be
copied to the Replacement Lines, but can be overwritten for specific
Lines.
Type
In this case, you choose Matrix or Assortment
Matrix
From No.
Master from which you want to replace Items.
After entering the From No., the From Description
will be shown.
Replacement Lines will be created for each (Assortment) Item
related to the From No. Master for which there are open Sales Lines, and
the system will automatically set a checkmark in Expand Matrix.
Therefore, if no Lines appear with Type Item,
there are no open Sales Lines with this From No. (Assortment) Master
that could be replaced based on the Filters on the FastTab Sales Line
Filters.
Pressing Alt+Arrow Down (lookup) in this field, will only
show the Masters for which there are open Sales Lines in the system based on
the Filters on the FastTab Sales Line Filters. I you however
entered a Master No., for which there are no open Sales Lines; you will get a
message:
From Variant 1
You can enter a specific Variant 1 (i.e., Color) of the From
No. (Assortment) Master that needs to be replaced.
In that case, after entering the To No. all the
related Item Lines for that Variant 1 will be shown.
This will only happen if there are open Sales Lines for
these Items.
If you leave this field blank, you might want to replace
only specific Variant 2 (i.e., Sizes) for all Variant 1 (i.e., Color) or you
want to replace all related Items of the From No. (Assortment) Master.
Replacement Lines will be deleted and recreated based on the
From No. Master and From Variant 1 for which there are open Sales
Lines.
Therefore, if no Lines appear again with Type Item,
no open Sales Lines exist that could be replaced with this From No. Master
and this From Variant 1 Color.
From Variant 2
You can enter a specific Variant 2 (i.e., Size or Assortment
Code) of the From No. (Assortment) Master that needs to be
replaced.
In that case, after entering the To No. the related
Items Lines for that Variant 2 will be shown.
This will only happen if there are open Sales Lines for
these Items.
If you leave this field blank, you might want to replace
only specific Variant 1 (i.e., Color) for all Variant 2 (i.e., Size or
Assortment Code) or you want to replace all related Items of the From No. (Assortment)
Master.
Replacement Lines will be deleted and recreated based on the
From No. Master, From Variant 1 Color and From Variant 2 Size
for which there are open Sales Lines.
Therefore, if no Lines appear again with Type Item,
no open Sales Lines exist that could be replaced with this From No., From
Variant 1 and From Variant 2.
Note
You are also able to choose the From Variant 3 - 9 values,
but these fields are not by default shown in the page, but you can select them
if necessary.
To No.
New (Assortment) Master that can replace the From No.
If this is the same Master as the From No. it simply
means that you want to replace Items within the same Master. After entering the
To No., the To Description will be shown.
The system will delete and recreate the Replacement Lines
with all variants of the From No. based on the From Variant 1 and
From Variant 2 entries, which are on open Sales Lines.
For the To No. (if different from the From No.)
it will only show the equal Variants that are present of the To No.
To Variant 1
You can enter a specific Variant 1 (i.e., Color) of the To
No. Master that will replace the From No. Variant 1.
If you leave this field blank, you might want to replace or
cancel only specific Variant 2 (i.e., Size or Assortment) for all Variant 1 (i.e.,
Color) or you want to replace or cancel all related Items of the From No. Master.
The system will delete and recreate the Replacement Lines based on the previous
fields and presence in open Sales Lines.
To Variant 2
You can enter a specific Variant 2 (Size or Assortment) of
the To No. Master that will replace the From No. Variant 2.
If you leave this field blank, you might want to replace or
cancel only specific Variant 1 (i.e., Color) for all Variant 2 (i.e., Size or
Assortment) or you want to replace or cancel all related Items of the From
No. Master. The system will delete and recreate the Replacement Lines based
on the previous fields and presence in open Sales Lines.
Note
You are also able to choose the To Variant 3 - 9 values.
Nevertheless, these fields are not by default shown in the page, but you can
select them if necessary.
This field can be added via Personalization.
You can change the content of the field for a specific
Replacement Line. Default is the Price
Determination of the Header of the Replacement.
Recalculate Line Discount
This field can be added via Personalization.
You can change the content of the field for a specific
Replacement Line. Default is the Recalculate
Line Discount of the Header of the Replacement.
Some Examples for entering the Lines for Replace:
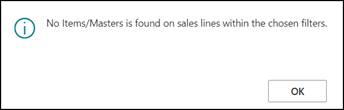
1.
If no open Sales Lines for the From No. and Variants are present
based on the Filters on the FastTab Sales Line Filters, you will
get a message:

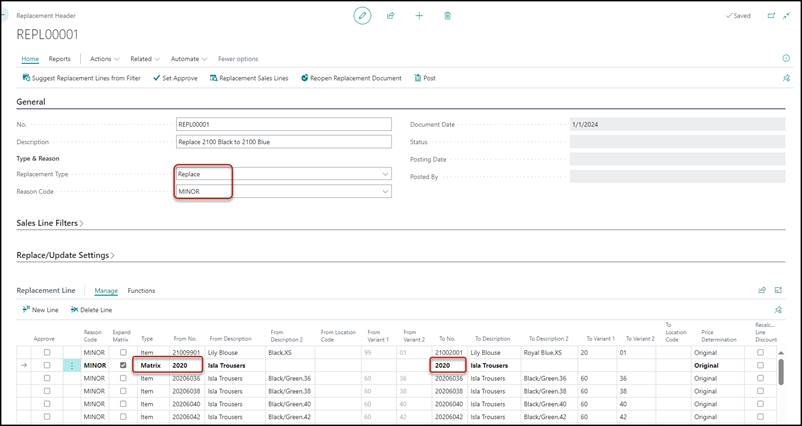
2.
You want to replace one color by another color for all sizes within the
same Master:
Only the red-highlighted Values need to be entered.
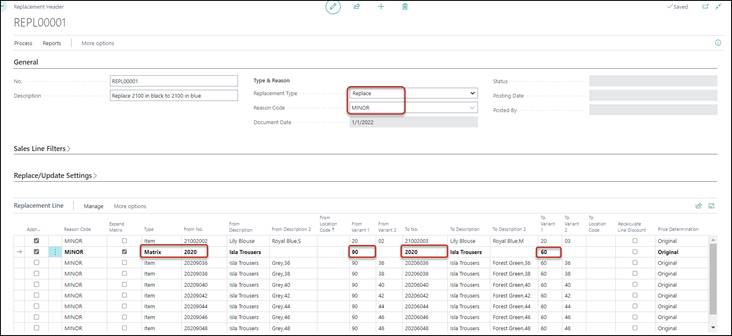
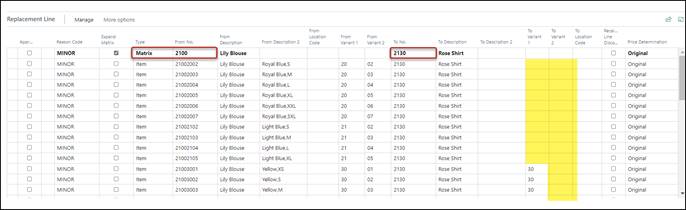
3.
If you want to replace one size by another size for all colors within
the same Master:
Only the red-highlighted values need to be entered.
You will only see the Colors/Sizes in the From that
are sold in Sales Lines based on the Filters in the FastTab Sales Lines
Filters.
4.
If you want to replace one color of a Master with the same color of
another Master where both Master have the same sizes:
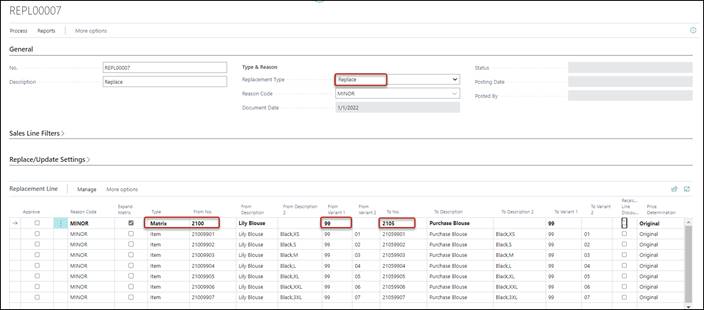
Only the red-highlighted values need to be entered.
As you can see, after entering
the To No. the To Variant 1 and To Variant 2 are
automatically filled.
This can only happen if the From
No. and the To No. have the same color 99 and the same sizes.
5.
If you want to replace one color of a Master with the same color of
another Master where both Master have varied sizes:
Only entering To No. and To
Variant 1 will not work: you need to enter the individual To Variant 2 values
or the To No. Items.
Only the red-highlighted values need to be entered.
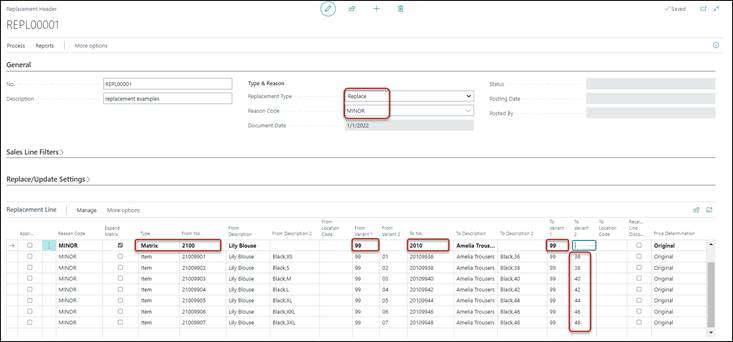
6.
If you want to replace one Master by another Master:
The system will match all
individual Variants of the From No. with the Variants of the To No.
For those combinations for which
not To No. exist (yellow highlighted), you need to enter the To No. Items
manually or the To Variant 1.
7. If
you want to replace one Assortment by another Assortment of the same Master

Only the red-highlighted values need to be entered.
If the Type is Assortment
Matrix, you will only be able to choose From Variant 2 and To
Variant 2 that are based on Assortments.
Note
To be able to connect From No. Items to To No. Items
based on Replacement Lines of Type Matrix or Assortment Matrix,
it is important that all individual Items of the Masters have been created.
Based on the parameter Create All Matrix Related Items in
the Inventory Setup all Items of a Master will be created upfront or
only created when you enter quantities in Sales-/Purchase Lines or in
Production-/Production Collecting Orders.
If this parameter does not have a checkmark, it can cause
problems in the Replacement functionality:
You will not see the To No. Items and Descriptions
based on the Replacement Dialog, because these Items simply do not exist yet.
In that case, you need to:
- Delete the Matrix Replacement Line
- Go to the Master Card of the To No. Master
- On click Actions, Warehouse, Create
Items
- Enter the Replacement Line again
You can only have the combination of Type and From
No. once in the Replacement. Otherwise, you will get an error message.
I.e.:

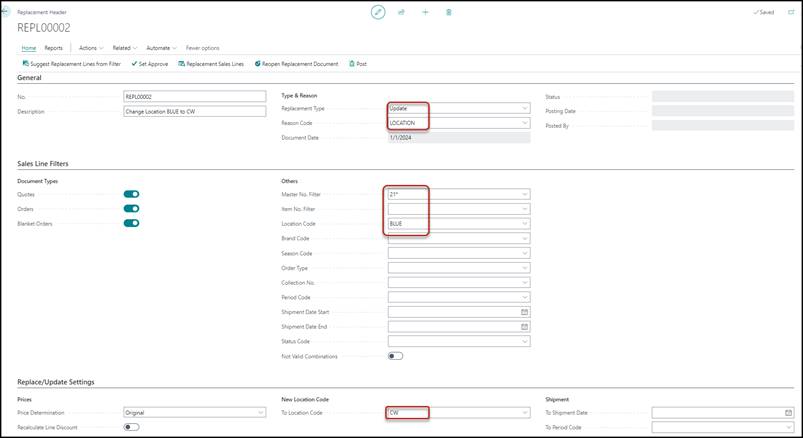
If you only want to update the existing Sales Lines, based
on the entries on FastTab Replace/Update Settings you need to
have the Replacement Type in the FastTab General, set to Update.
In that case, you only need to enter the From fields the
same way as shown in Replace and Update Item
and Replace and Update Color, Size or
Assortment of Masters and NOT the To fields.
An example could be the update of all Sales Lines with
Masters starting with 21 and change the Location Code is BLUE
to the To Location Code to CW:
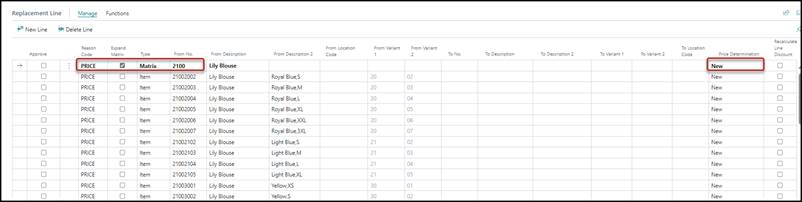
Another example could be that the Sales Prices have changed
during a pre-sales period, and you want to update the Sales Prices on the open
Sales Lines for a specific Master:
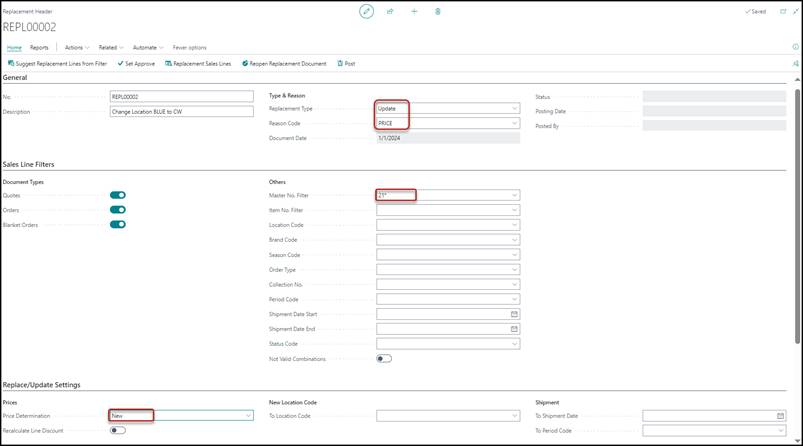
For both examples: After entering the FastTabs Sales
Line Filters and Replace/Update Settings you can create
the Replacement Lines with the action (Home), Suggest Replacement Lines from Filters.
In that case, only the From fields will be filled.
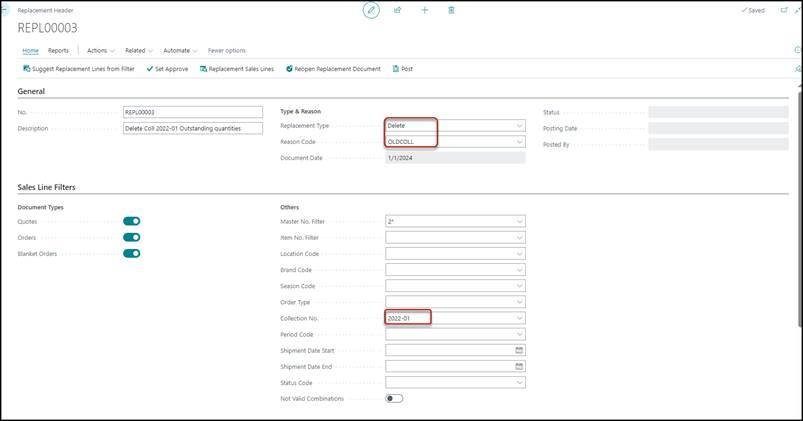
If you want to delete existing Sales Lines or want to
decrease the Outstanding Quantity on the existing Sales Lines to zero, you need
to have the Replacement Type in the FastTab General, set
to Delete.
In that case, you only need to enter the From fields the
same way as shown in Replace and Update Item
and Replace and Update Color, Size or
Assortment of Masters and NOT the To fields.
An example could be to filter on all Sales Lines of an old Collection
No.:
Another example could be to delete all the Sales Lines of a
specific Master:
For both examples: After entering the FastTabs Sales
Line Filters and Replace/Update Settings you can create
the Replacement Lines with the action (Home), Suggest Replacement Lines from Filters.
In that case, only the From fields will be filled.
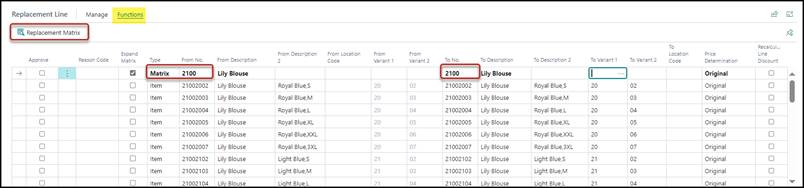
Instead of using the fields From Variant 1 - 9
on the Replacement Lines with Type Matrix or Assortment
Matrix directly, you can also use the Replacement Matrix to filter
the Replacement Lines of a Master.
After you have entered the From No. (and the To
No. in case of a Replace) on a Replacement Line with Type Matrix
or Assortment Matrix, you are able to open the Replacement Matrix
to limit the Items of the From No. which is a Master Number.
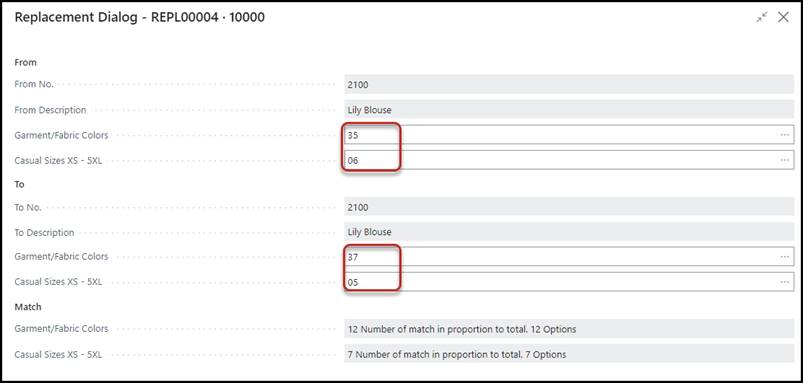
From No.
The From No. Master you entered on the Replacement
Line. This field cannot be changed in the Dialog page. If you made a mistake,
you need to go back to the Replacement Line to change the From No. in
the Line.
From Description
The Description of the From No. Master is shown.
From Variant 1
If you want to replace/update/delete a complete Color
(Variant 1) of the From No. Master, you can enter the value of that
Color.
If you want to replace/update/delete a complete Master or
all the Colors for a specific Size (Variant 2) by another Master or combination
of Variants, you leave this field blank.
In the screenshot, you see Garment/Fabric Colors.
This is the description of the first VarDim Type connected to the chosen From
No. Master of the Replacement Line.
The entered 35 stands for the color Orange.
You are only able to enter a Value for which there are
existing Sales Lines.
From Variant 2
If you want to replace or cancel a complete Size (Variant 2)
of the From No. Master, you can enter the value of that Size.
If you want to replace or cancel a complete Master or all
the Sizes for a specific Color (Variant 1) by another Master or combination of Variants,
you leave this field blank.
In the screenshot, you see Casual Sizes XS – 5XL.
This is the description of the second VarDim Type connected to the chosen From
No. Master of the Replacement Line.
The entered 06 stands for size XXL
You are only able to enter a Value for which there are
existing Sales Lines.
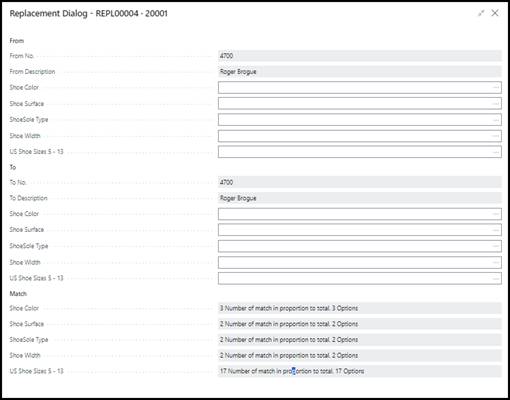
Note
The replacement functionality, and therefore also the
Replacement Dialog can manage all nine VarDim Types to replace or cancel.
I.e., for Master 4700 with five Variants, it
would look like:
To No.
The To No. Master you entered on the Replacement
Line. This field cannot be changed in the Dialog page. If you made a mistake,
you need to go back to the Replacement Line to change the To No. in the
Line.
To Description
The Description of the To No. Master is shown.
To Variant 1
If you want to replace/update/delete a complete Color of the
From No. Master, you can enter the Value for the new Color of the To
No. Master.
If you want to replace a complete Master by another Master,
you leave this field blank.
If you want to update/delete a complete Master or specific
Sizes of a Master, you also leave this field blank.
In the screenshot, you see Garment/Fabric Colors. This
is the description of the first VarDim Type connected to the chosen To No. Master
of the Replacement Line.
The entered 37 stands for the color Dark
Orange.
To Variant 2
If you want to replace/update/delete a complete Size of the From
No. Master, you can enter the Value for the new Size of the To No. Master.
If you want to replace a complete Master by another Master,
you leave this field blank.
In the screenshot, you see Casual Sizes XS – 5XL.
This is the description of the second VarDim Type connected to the chosen To
No. Master of the Replacement Line.
Match
The Information beneath Match shows the matches
between the VarDim Types of the From No. Master and the To No. Master.
Note
If you want to replace a specific Master completely by
another Master, you only need to enter the 2 Master Codes and nothing in the From
Variant1/From Variant2/To Variant1/To Variant2, etc.
You must be aware in this case, that the VarDim Types of both
Masters should be the same!!
After accepting the Replacement Dialog with the OK
button or by pressing Esc, the Item Replacement Lines based on this
Dialog will be created.

Note
To be able to connect From No. Items to To No. Items,
it is important that the individual Items have been created.
Based on the parameter Create All Matrix Related Items in
the Inventory Setup all Items of a Master will be created or only
created when you enter quantities in Sales-/Purchase Lines or in
Production-/Production Collecting Orders.
If this parameter does not have a checkmark, it can cause
problems in the Replacement functionality:
You will not see the To No. Items and Descriptions
based on the Replacement Dialog, because these Items simply do not exist yet.
In that case, you need to:
- Delete the Matrix Replacement Line
- Go to the Master Card of the To No. Master
- On Related, Warehouse, Create Items
- Enter the Replacement Line again
On the Matrix Replacement Line, the totals are shown of the
related Item Replacement Lines.
Now the fields From Variant 1, From Variant 2,
To Variant 1 and To Variant 2 are also filled.

Suggest Replacement Lines from Filters
With this action, existing Replacement Lines will be deleted,
and new Replacement Lines will be created based on the filters you entered on
the FastTab Sales Line Filters.
After the Replacement Lines have been created, you can still
manually change them.
You will get a message, which needs to be confirmed by
clicking Yes; otherwise, nothing happens.
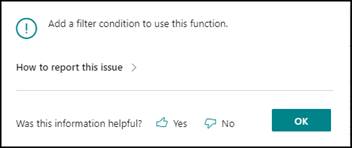
To use this action, you need to have one or more filters
filled in the FastTab Sales Line Filters.
Otherwise, you will get a message, which needs to be
confirmed by clicking OK.
Before the next step in the Replacement procedure (determine
which Sales Lines should be replaced, deleted, and/or updated) you need to Approve
the lines. You can do this manually by entering a checkmark in the field Approve
in the Replacement Lines, but you can also use the action (Home), Set
Approve.
This will set the checkmark for Approve in all the
Replacement Lines.
Approving a Matrix or Assortment Line will
automatically also approve the underlying Item Lines.
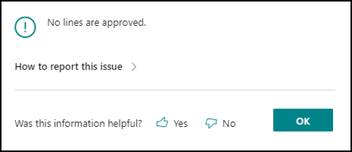
Forgetting to approve the lines, will give you a message in
the next step Replacement Sales Lines
and nothing will happen:
Replacement Sales Lines
After you have created or entered the Replacement Lines and
Approved the Lines, you need to determine which Sales Lines have the From
Item No. in it, and could be replaced, deleted, and/or updated.
This can be done by using the action (Home), Replacement
Sales Lines.
Note
Every time you activate the action Replacement Sales Lines,
the existing Replacement Sales Lines will be deleted.
Therefore, any changes you might have entered before in the Replacement
Sales Lines will be lost again!
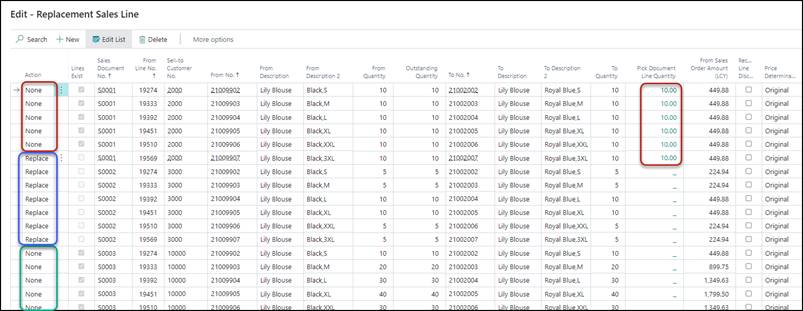
Based on entered filters in FastTab Sales Line Filters and based on
approved Replacement Lines the system will show all the open Sales Lines
in which the From Items are present. I.e.:

You can add/remove fields in this Page to see more/less
details.
The fields To Unit Price and To Line Discount % will
however stay 0,00 until the Replacement has been posted and will not be
calculated up front when creating the Replacement Sales Lines.
Action
When the Replacement Sales Lines are created, the Action
will be set by the system automatically but can be changed:
You can choose between the following five options:
|
Replace
|
The From Item can be replaced (and updated) by the To
Item (and the fields on FastTab Replace/Update Settings).
This means that the original Sales Line with the From Item will be
deleted, and a new Sales Line will be created with the To Item.
In the new Sales Line, also the fields can be updated
based on the fields on FastTab Replace/Update Settings.
In case the Outstanding Quantity <> Quantity
of the Sales Line (a part already has been shipped/invoiced), the
original Sales Line will be decreased with the Outstanding Quantity and
a new Sales Line will be created with the Outstanding Quantity.
|
|
Delete
|
The Sales Line with the From Item will be deleted
from the original Sales Order.
In case the Outstanding Quantity <> Quantity
of the Sales Line (a part already has been shipped/invoiced), the
original Sales Line will be decreased with the Outstanding Quantity.
|
|
None
|
No Action will be conducted,
because there are already existing Sales Lines with the To No. Item or
because there are already Quantities on a Pick Document Line or because there
is a Related Order connected to the Sales Line.
This can be seen in the fields
on the Replacement Sales Lines if you scroll to the right.
If you try to change the None
into Replace or Delete and the Sales Line is already on
a Pick Document, or there is a Related Order, an error message will appear:

|
|
Update
|
The Unit Price and Sales Line Discount can
be recalculated based on the current Sales Prices and based on the entries in
the FastTab Replace/Update Settings.
The fields Location Code, Shipment Date and/or Period
Code can be changed based on the entries in the FastTab Replace/Update
Settings.
|
|
Partly Replace
|
If there is an open Pick Document Line for a Replacement
Sales Line, and the Pick Line Quantity (Qty. to be Picked) on the Pick
Document Line is less than the Outstanding Quantity of the Sales Line, the
Action will be set automatically to Partly Replace if you have chosen
the Replacement Type Replace.
|
The chosen Replacement Type in the Header also
determines the choices you can change manually:
|
Replace
|
Only Replace or None
|
|
Update
|
Only Update or None
|
|
Delete
|
Only Delete or None
|
Lines Exist
A checkmark will automatically appear if there is already an
open Sales Line for the same Customer with the To No. Item in it.
In that case, you can see the existing Sales Line (s) via Related,
Function, Existing Sales Line Replacement No.
The rest of the fields of the Replacement Sales Line contain
information of the specific open Sales Lines.
The fields Price Determination, Recalculate Line
Discount, To Shipment Date and To Period Code can still be changed
per Replacement Sales Line. These fields are default filled with the content of
the fields of the Replacement Line and the fields on the FastTab Replace/Update
Settings.
You can see all the Sales Lines of the Sell-to Customer
No. of a Replacement Sales Line via Related, Function,
Existing Sales Line Customer.
You can see the information of the current Replacement
Sales Line by click on the Sales Document No. and then click Open
full list and in the Sales List click Show Document.
If a Replacement has not been posted yet, but you did
already create the Replacement Sales Lines by clicking (Home), Replacement
Sales Lines, the Replacement got the Status Active.
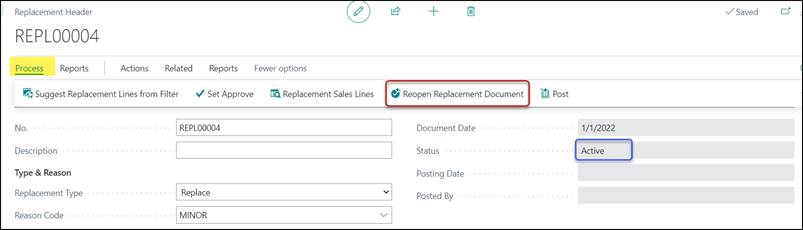
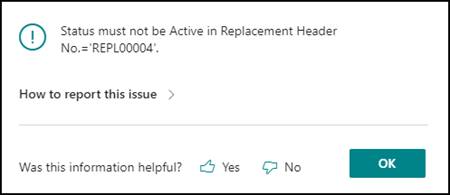
In that case, it is not possible to change the Replacement
Lines anymore; you will even get an error message if you try to change the
Replacement Lines or add new Replacement Lines:
To be able to change Replacement Lines anyhow, you need to
click (Home), Reopen Replacement Document. In that
case, you will get a message:
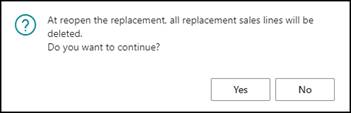
By clicking Yes, any created Replacement Sales
Lines will be deleted again, and the Status will be empty again.
After you have created the Replacement Sales Lines –
and have changed the Actions for those Lines if necessary – you can Post the
Replacement by clicking (Home), Post, or by
pressing F9.

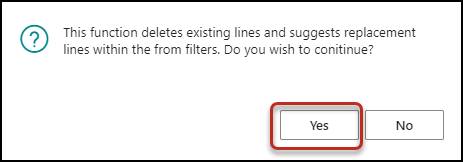
You will get a message to continue:
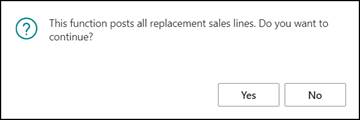
Click Yes.
After the Posting of the
Replacement the fields Status (will be set to Posted), Posting
Date (will be set to Windows Date) and Posted by (will be set to the
User-ID) in the Header are updated.

After Posting, nothing can be changed anymore on this
Replacement Header and now you cannot Reopen the Replacement anymore.
If you now click (Home), Replacement
Sales Lines, you will only see the Sales Lines, that have been
replaced/updated/deleted.
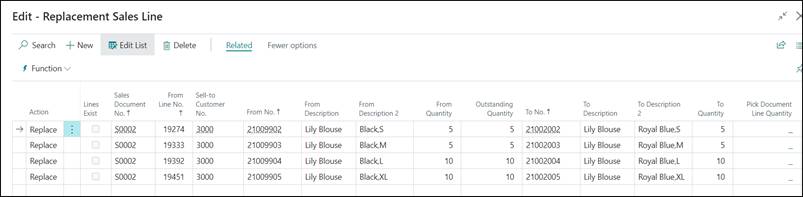
Now, also the fields To Unit Price and To Line
Discount % will be filled with the new values of the replaced/updated Sales
Lines.
For the Replacement Sales Lines with Action = Replace the
original Sales Lines with the From Item in the Sales Line will be
deleted and new Sales Lines will be created for the To Item.
For the Replacement Sales Lines with Action = Delete the
original Sales Lines with the From Item in the Sales Line will be
deleted.
For the Replacement Sales Lines with Action = Update the
original Sales Lines with the From Item in the Sales Line will be
changed.
For the original Sales Order S0002 from the picture
above, in which the Master 2110 in Color 99 Black was ordered,
and the Matrix looked like:
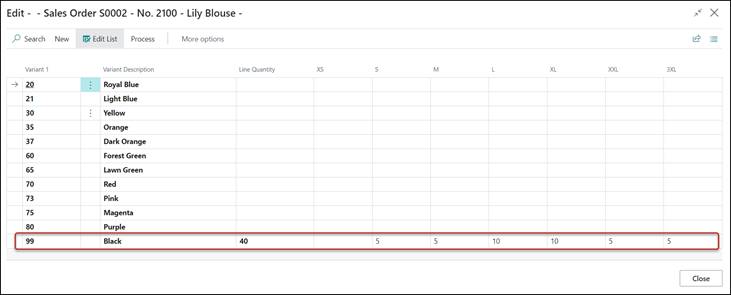
After posting, the Matrix will look like: 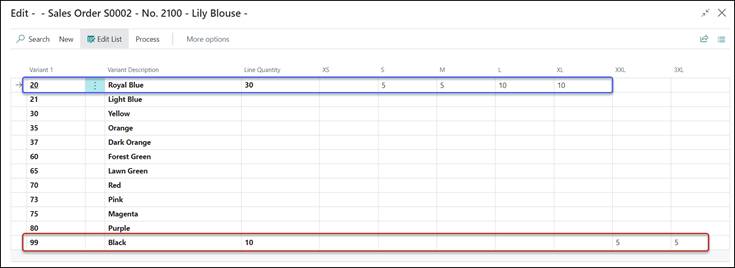
The quantities of the color 99 Black sizes XS-XL have
now been replaced by the color 20 Royal Blue.
Note
If an original Sales Line is already partly shipped, the
Status of that Sales Order will be Released.
The posting of the Replacement will be conducted, but after
the Posting of the Replacement,
the Status will be Open again.
Therefore, you know something has happened and you might have
to Release it again manually because of using Warehouse Management.
If the Action was Replace, the Quantity on the
original Sales Line will be changed into the Shipped Quantity and a new Sales
Line will be created for the Outstanding Quantity.

By clicking Actions, Manage, Expand All, all
the Matrix Lines of the Replacement will be expanded; you will see the Matrix
Lines and the related Item Lines.
By clicking Actions, Manage, Collapse All, all
the Matrix Lines of the Replacement will be collapsed; you will only see the
Matrix Lines.
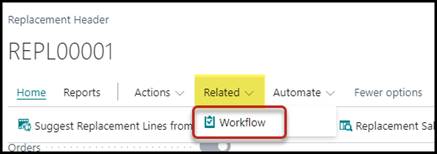
Workflow
You can add a TRIMIT Workflow to your Replacement.
For the TRIMIT Workflow, you can also copy it by using a Workflow
Template with the Use for All or Replacement.
See White Paper – TRIMIT Workflow for more
details regarding the TRIMIT Workflow.
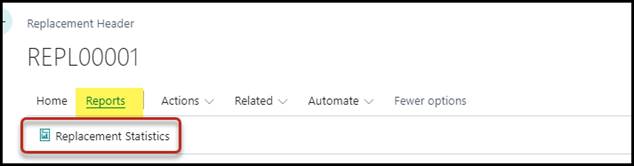
The Report Replacement Statistics gives an overview
of all the filtered Replacements.
Click Reports, Replacement Statistics to run
the report.
You can also run it in a Role Center by clicking Search
and look for Replacement Statistics.

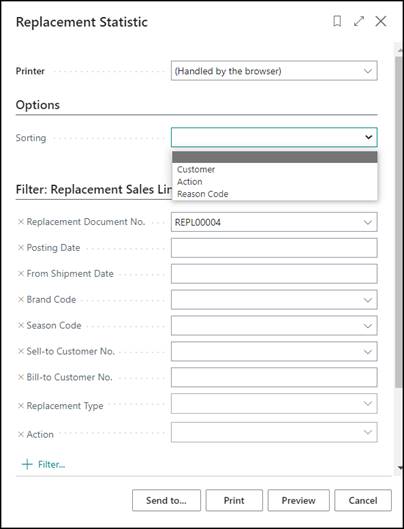
On the Options FastTab, you can determine in which
order the information should be printed:
Blank, Customer, Action, or Reason Code.
If Sorting is blank, the information will be
printed in the sorting of the Replacement Header Numbers.
The report will only show the Lines, which are really
replaced, updated, or deleted.

There is also a report that you can add to the Page
Actions FactBox in the Replacement or in the My Actions in
a TRIMIT Role Center.
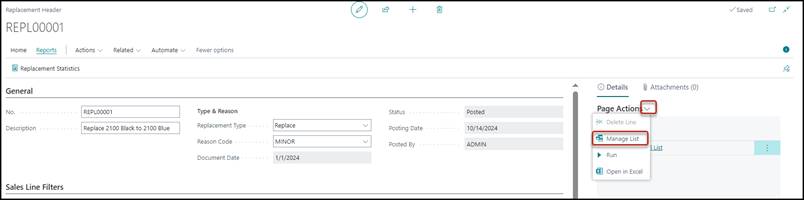
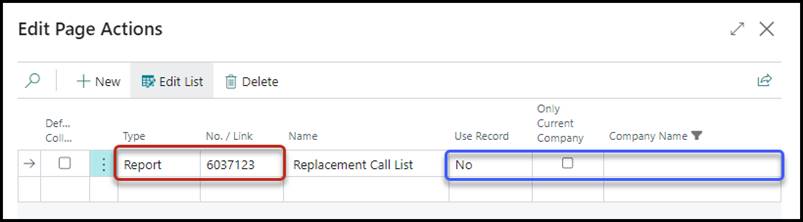
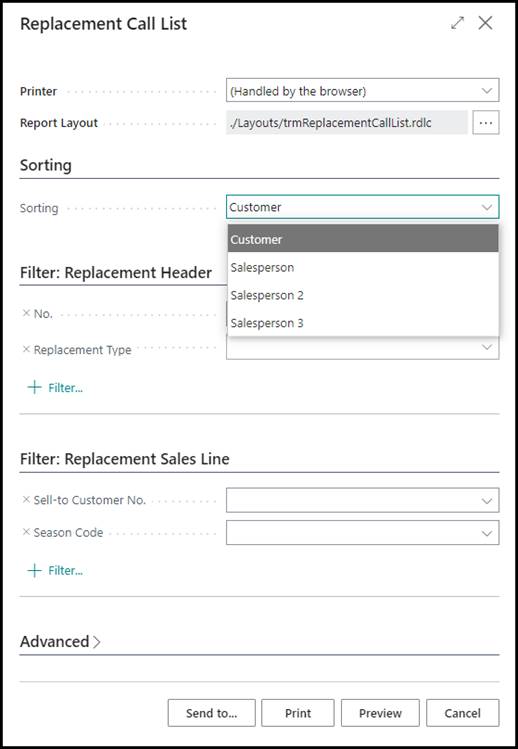
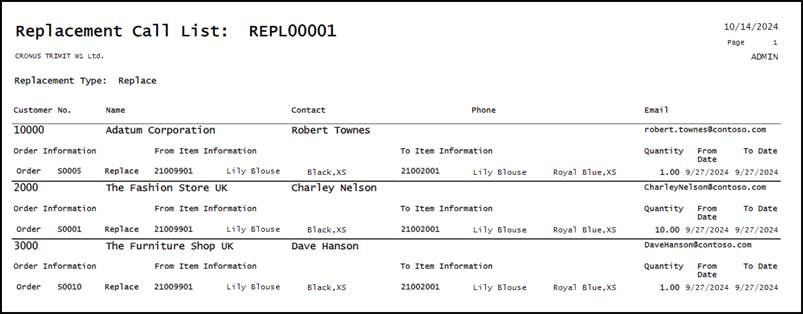
Report 6037123 Replacement Call List.
This Report will show you for one specific Replacement
Header – which need to be entered - , the Sales Lines that have been replaced, deleted,
or updated. The Report can be sorted by Customer, Salesperson, Salesperson 2,
or Salesperson 3.